

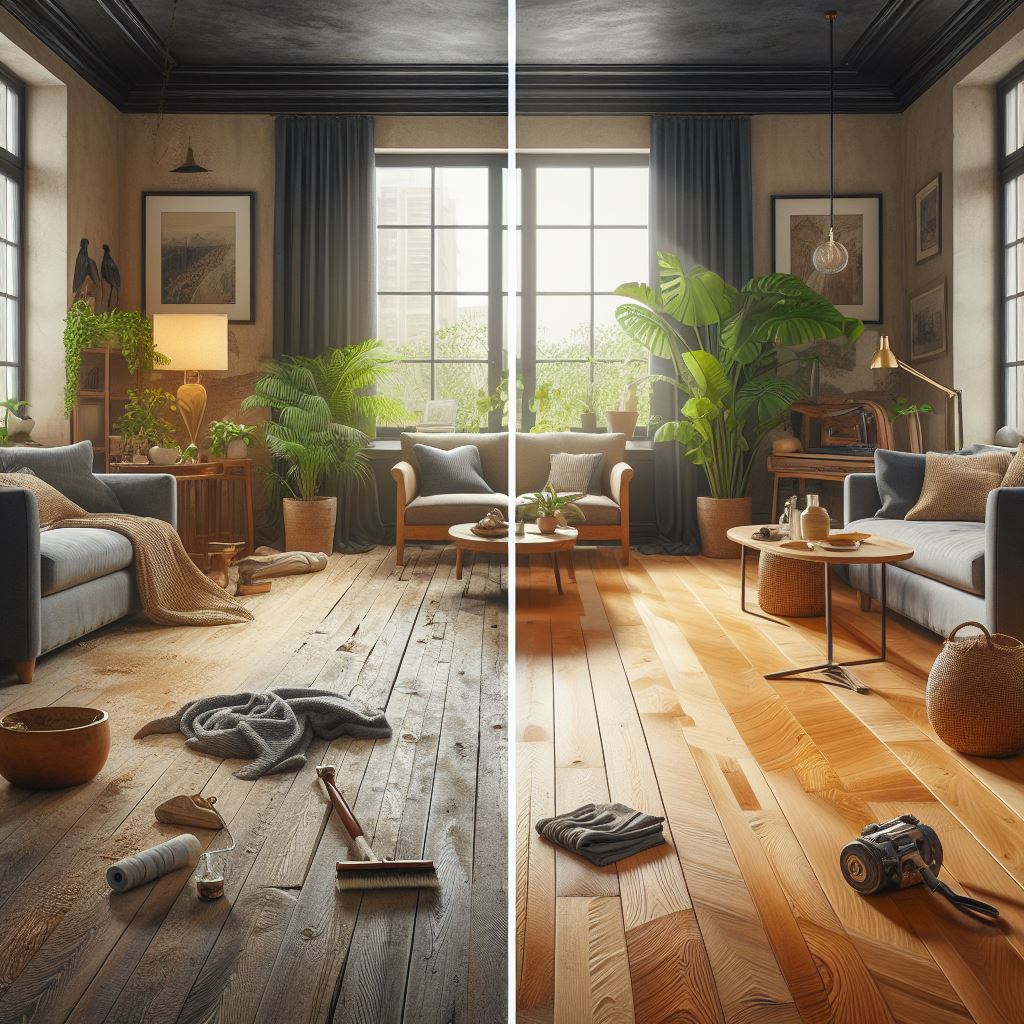
Welcome to the world of beautiful parquet flooring—an embodiment of elegance and sophistication in homes across Dallas Fortworth. Like any cherished possession, parquet floors can sustain scratches and wear over time, demanding prompt and careful attention to restore their pristine condition. Understanding how to repair parquet flooring scratches is essential for maintaining the luster and longevity of your flooring investment.
Scratches on parquet floors can range from superficial to deep gouges. Superficial scratches are often easier to handle and can be rectified with simple DIY solutions. However, deeper scratches may require more intensive restoration techniques. Repairing these imperfections not only enhances the visual appeal of your space but also protects the wood from further damage.
At Paradise Spaces, we specialize in bringing the glory back to your hardwood and luxury vinyl floors. If you're unsure about tackling repairs on your own or you're dealing with significant damage, we're here to help. Request a free estimate or email us at sales@paradise-spaces.com for professional guidance tailored to your flooring needs.
Understanding Parquet Floors and Common Damages

Parquet floors are a timeless feature that add a touch of classic charm to any room. Composed of pieces of wood arranged in a geometric mosaic, this type of flooring is renowned for its durability and the warmth it brings to a space. However, even the most resilient floors are not immune to damage. Recognizing the types of harm your parquet floor can sustain is the first step in preserving its beauty.
Common damages to parquet floors include scratches from daily foot traffic, pet claws, or moving furniture. Dents can occur from high heels or dropped objects. Water damage is another concern, as prolonged exposure to moisture can lead to warping or staining. Sunlight can also cause discoloration over time, affecting the floor's uniform look.
Each type of damage requires a specific repair approach. For instance, light scratches might only need a simple buffing, while deeper ones could necessitate sanding and refinishing. Water damage may require the replacement of affected tiles to prevent further deterioration. By understanding the nature of these common damages, homeowners can take the appropriate action to repair and protect their parquet flooring, ensuring it continues to grace their living spaces with its inherent sophistication.
Essential Tools and Materials for Parquet Repair

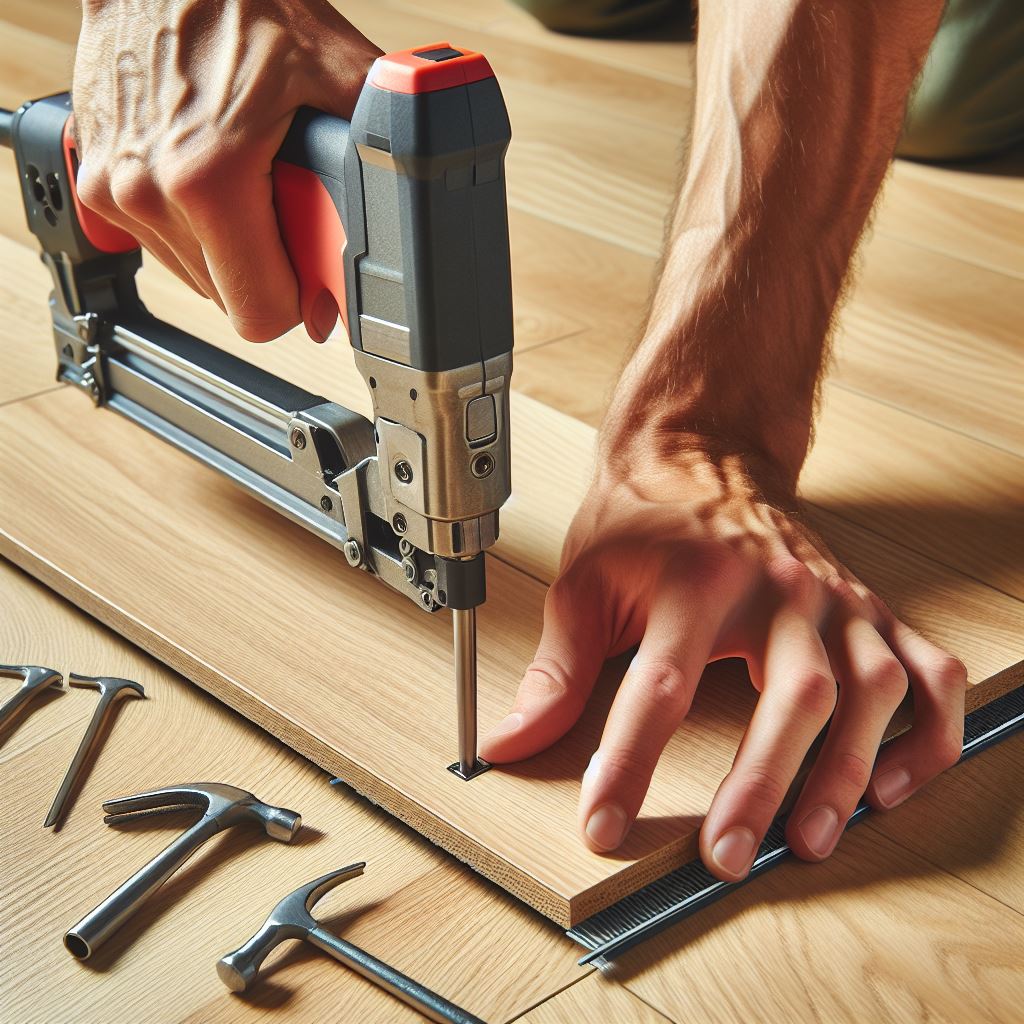
Embarking on the repair of parquet flooring scratches necessitates a set of specific tools and materials to ensure a seamless and effective restoration process. The foundation of your repair toolkit should include fine-grit sandpaper or a sanding pad, which is instrumental in smoothing out imperfections without causing additional abrasions to the wood surface.
- Fine-grit sandpaper or sanding pad - To delicately smooth out scratches.
- Wood filler or putty - To fill in deeper gouges and provide a level surface.
- Putty knife - To apply and smooth the wood filler.
- Matching wood stain - To ensure repaired areas blend with the original flooring color.
- Clear varnish or polyurethane - To seal and protect the repaired section.
- Soft cloths - For cleaning the surface and applying stain.
- Painter's tape - To protect the surrounding area during the repair process.
It's crucial to select a wood filler or putty that closely matches the color of your parquet floors. This will help in creating an inconspicuous repair, maintaining the floor's overall aesthetic. Similarly, choosing the right shade of wood stain is essential for blending the repaired area with the existing flooring. Finally, a high-quality clear varnish or polyurethane finish will act as a protective layer, safeguarding your repairs and contributing to the longevity of the floor. With these essential tools and materials on hand, you're well-prepared to tackle the task of repairing parquet flooring scratches, restoring the luster and integrity of your hardwood floors.
Step-by-Step Guide to Fixing Surface Scratches
Achieving a flawless repair on parquet flooring scratches involves a meticulous step-by-step process that can restore the original splendor of your hardwood floors. Begin by thoroughly cleaning the affected area, removing any dust or debris that could interfere with the repair work. Once the floor is clean, proceed with the following steps:
- Clean the Scratch - Use a soft cloth to ensure the scratched area is free of any particles.
- Sand the Area - Gently sand the scratch with fine-grit sandpaper, moving along the grain of the wood to avoid further damage.
- Wipe Away Residue - Remove all sanding dust with a slightly damp cloth, then allow the area to dry completely.
- Apply Wood Stain - If the scratch has removed the stain, use a small artist's brush to apply matching wood stain to the sanded area. Wipe away excess stain with a clean cloth.
- Let it Dry - Allow sufficient time for the stain to dry thoroughly before proceeding to the next step.
- Seal with Varnish - Once the stain is dry, apply a thin layer of clear varnish or polyurethane to seal and protect the repaired scratch. Use a fine-bristled brush for a smooth application.
- Dry and Buff - After the varnish has dried, gently buff the area with a soft cloth to blend the repair into the surrounding floor.
This systematic approach ensures that surface scratches are effectively camouflaged, helping to maintain the continuous elegance of your parquet floors. It's important to take your time with each step and allow for adequate drying times to achieve the best results. With the right technique, even the most noticeable scratches can be made to virtually disappear, leaving your hardwood flooring looking as good as new.
Techniques for Repairing Deep Parquet Scratches
Deep scratches in parquet flooring require more attention than surface blemishes, as they can penetrate the wood's finish and affect its integrity. Here is a methodical approach to effectively tackle these unsightly marks:
- Select the Right Wood Filler - Choose a wood filler that closely matches the color of your parquet flooring. For best results, opt for a stainable filler that can be adjusted to the exact shade of your floors.
- Fill the Scratch - Apply the wood filler into the scratch using a putty knife, ensuring it is completely filled and level with the floor surface. Wipe away any excess filler before it dries to minimize sanding later.
- Sand the Filled Area - Once the filler has dried, sand it down with fine-grit sandpaper until it's flush with the floor. Be careful to sand along the grain to maintain the wood's appearance.
- Clean the Area - Remove all sanding residue with a soft cloth, then inspect the repair to ensure it's smooth and even.
- Stain to Match - Apply a wood stain that matches your floor's finish to the repaired area using a small brush, blending it with the surrounding wood.
- Seal the Repair - Protect the area by applying a clear coat of polyurethane or varnish. This will also help in achieving a uniform sheen across your flooring.
By following these steps, even the deepest scratches can be remedied, restoring the parquet floor's seamless beauty and longevity. It's crucial to allow each layer—filler, stain, and sealant—to dry adequately before proceeding to the next to ensure a durable and visually appealing finish. With patience and precision, your parquet floors can look impeccably maintained, regardless of the challenges they face.
Finishing Touches: Sealing and Protecting Your Parquet
Once the parquet scratches are repaired, applying the finishing touches is essential to seal and protect your floor. This final step will not only enhance the appearance of the parquet but also extend its lifespan by providing a protective layer against future wear and tear.
- Choose the Right Sealant - Select a high-quality polyurethane, varnish, or another suitable sealant that is compatible with your flooring. Consider the level of gloss you desire, as sealants come in matte, satin, and glossy finishes.
- Apply Evenly - Use a fine-bristle brush or a foam applicator to apply the sealant in thin, even coats. Work along the grain of the wood to avoid streaks and ensure a smooth finish.
- Allow Adequate Drying Time - Consult the manufacturer's instructions for drying times. Typically, you should wait several hours between coats and avoid walking on the floor until the sealant has fully cured.
- Light Sanding Between Coats - For the best results, lightly sand the floor with fine-grit sandpaper between coats to achieve a smooth, professional finish.
Sealing is not just about aesthetics; it's about safeguarding your investment. A well-sealed parquet floor can withstand the rigors of daily life, maintaining its elegance and resilience for years to come. If you're unsure about the correct products or techniques for your specific flooring, or if you require assistance with larger or more complex repairs, Paradise Spaces is here to help.
Request a free estimate or email us at sales@paradise-spaces.com for professional advice and services tailored to your flooring needs. Our expertise in hardwood and luxury vinyl floors ensures your parquet remains a pristine and cherished feature of your home.